For years, plastic skimmer covers have been a staple in pool maintenance, but they come with an array of drawbacks that are hard to ignore. While they fulfill a necessary function, their unsightly appearance and tripping hazard risks have made them a reluctant addition for pool owners.
HIDE has developed an innovative solution that not only enhances safety but also dramatically elevates the look of the pool area. Their easy-to-use kits create an enduring and aesthetically pleasing solution.
HIDE covers are made from high-quality 316 marine-grade stainless steel. Installing a HIDE cover kit is simple and the finished product seamlessly blends with the surrounding hardscape materials. The HIDE cover rests flush with the surrounding deck, creating a sophisticated and high-end look for any landscape project.
HIDE covers can be integrated into a variety of landscaped areas and can be filled with various materials like porcelain tile, pavers, stone, timber decking, wet-pour concrete, and artificial grass. One standout feature of the HIDE system is the Edge Protector, which prevents damage to surrounding tile, stone, or concrete when opening and closing the cover. These covers support the edges, preventing any chipping, cracking, or breakages.

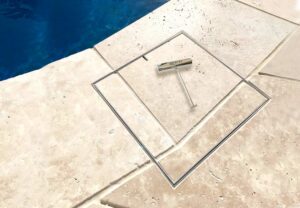
Position the HIDE skimmer cover’s edge protector over the skimmer and square it up. Mark its position using chalk.
Tape the external edge of the skimmer cover to protect the surrounding pool deck. Leave a slight (.11 inch) expansion gap between the edge protector and the deck to accommodate any temperature-induced expansion.
Carefully remove the existing dress ring around the skimmer cover.
Using the marked area as a guide, cut the tiles around the skimmer cover that need to be removed. For better access, make horizontal cuts into the corners to aid in tile removal.
Cut the concrete base around the skimmer cover to match the depth of the edge protector. Use a chisel to remove any excess concrete and adjust the levels until the edge protector sits just below the surface level of the pool deck.
Fill the recess around the edge protector with a mortar bed to provide a stable foundation for the skimmer cover.
Carefully install the HIDE skimmer cover’s edge protector into the recess, ensuring it sits flush with the pool deck. Press down firmly, and then check its alignment with a straight edge.
Cut the tiles to fit the lid of the skimmer cover. You can use a single piece of tile or pattern-match smaller pieces to match the surrounding tiles.
Insert the tile into the lid and mark out the keyway. Use a grinder to cut the keyway, ensuring the key fits securely.
If the stone sits too low in the lid, the HIDE skimmer cover kit also includes a height adjuster. Use this to raise the stone to the desired level.
Apply adhesive to the lid in strips. Place the lid over the back of the stone or height adjuster on a flat surface. Ensure it fits snugly.
Use flexible filler to fill the expansion gap between the edge protector and the pool deck.
Carefully remove the tape from the pool deck. Allow the adhesive and filler to dry completely before using the pool.
Want to know more about HIDE covers or any of our exceptional products and manufacturers? We provide product demos and training too. Contact our skilled team of pool manufacturer representatives at hello@alphawest.com or use our territories map to find the rep for your area.